您现在的位置是:网站首页> .NET Core
.NET Core基础问题收集
- .NET Core
- 2026-09-23
- 2047人已阅读
.NET Core基础问题收集
***运行ASP.NET Core项目可以发布后直接命令行:dotnet dll文件名.dll***
MAUI配置发布Android IOS等个平台独特的文件配置
***Avalonia.NET编译Android配置签名***
Linux x64、Linux x86(32位)、ARM(ARM32/ARM64)及 x86 平台的 dotnet publish
ASP.NET Core 程序发布到Linux(Centos7)爬坑实战
Linux x64、Linux x86(32位)、ARM(ARM32/ARM64)及 x86 平台的 dotnet publish
如何使用 dotnet 命令行发布带签名的 Android 应用。
.NET4.5的API在.net core 中有哪些api不兼容
判断平台
ANDROID
IOS
WINDOWS
MACCATALYST
#if ANDROID
using Android.Content;
using Android.Views;
using Android.Runtime;
#elif IOS
using UIKit;
#endif
using InvokePlatformCodeDemos.Services;
namespace InvokePlatformCodeDemos.Services.ConditionalCompilation
{
public class DeviceOrientationService
{
public DeviceOrientation GetOrientation()
{
#if ANDROID
IWindowManager windowManager = Android.App.Application.Context.GetSystemService(Context.WindowService).JavaCast<IWindowManager>();
SurfaceOrientation orientation = windowManager.DefaultDisplay.Rotation;
bool isLandscape = orientation == SurfaceOrientation.Rotation90 || orientation == SurfaceOrientation.Rotation270;
return isLandscape ? DeviceOrientation.Landscape : DeviceOrientation.Portrait;
#elif IOS
UIInterfaceOrientation orientation = UIApplication.SharedApplication.StatusBarOrientation;
bool isPortrait = orientation == UIInterfaceOrientation.Portrait || orientation == UIInterfaceOrientation.PortraitUpsideDown;
return isPortrait ? DeviceOrientation.Portrait : DeviceOrientation.Landscape;
#else
return DeviceOrientation.Undefined;
#endif
}
}
}
// 定义一个接口
public interface IDeviceService
{
void DoSomething();
}
// 为每个平台实现该接口
#if ANDROID
public class AndroidDeviceService : IDeviceService
{
public void DoSomething()
{
// Android 特定代码
}
}
#elif IOS
public class IosDeviceService : IDeviceService
{
public void DoSomething()
{
// iOS 特定代码
}
}
#elif WINDOWS
public class WindowsDeviceService : IDeviceService
{
public void DoSomething()
{
// Windows 特定代码
}
}
#elif MACCATALYST
public class MacCatalystDeviceService : IDeviceService
{
public void DoSomething()
{
// Mac Catalyst 特定代码
}
}
#endif
<!-- Android -->
<ItemGroup Condition="$(TargetFramework.StartsWith('net8.0-android')) != true">
<Compile Remove="**\*.Android.cs" />
<None Include="**\*.Android.cs" Exclude="$(DefaultItemExcludes);$(DefaultExcludesInProjectFolder)" />
</ItemGroup>
<!-- Both iOS and Mac Catalyst -->
<ItemGroup Condition="$(TargetFramework.StartsWith('net8.0-ios')) != true AND $(TargetFramework.StartsWith('net8.0-maccatalyst')) != true">
<Compile Remove="**\*.MaciOS.cs" />
<None Include="**\*.MaciOS.cs" Exclude="$(DefaultItemExcludes);$(DefaultExcludesInProjectFolder)" />
</ItemGroup>
<!-- iOS -->
<ItemGroup Condition="$(TargetFramework.StartsWith('net8.0-ios')) != true">
<Compile Remove="**\*.iOS.cs" />
<None Include="**\*.iOS.cs" Exclude="$(DefaultItemExcludes);$(DefaultExcludesInProjectFolder)" />
</ItemGroup>
<!-- Mac Catalyst -->
<ItemGroup Condition="$(TargetFramework.StartsWith('net8.0-maccatalyst')) != true">
<Compile Remove="**\*.MacCatalyst.cs" />
<None Include="**\*.MacCatalyst.cs" Exclude="$(DefaultItemExcludes);$(DefaultExcludesInProjectFolder)" />
</ItemGroup>
<!-- Windows -->
<ItemGroup Condition="$(TargetFramework.Contains('-windows')) != true">
<Compile Remove="**\*.Windows.cs" />
<None Include="**\*.Windows.cs" Exclude="$(DefaultItemExcludes);$(DefaultExcludesInProjectFolder)" />
</ItemGroup>
此 XML 将生成系统配置为在特定条件下删除基于平台的文件名模式:
不要编译文件名以 . 结尾的 C# 代码 。Android.cs(如果未为 Android 生成)。
不要编译文件名以 . 结尾的 C# 代码 。MaciOS.cs,如果不为 iOS 和 Mac Catalyst 生成。
如果不为 iOS 生成文件名以 .iOS.cs 结尾,请不要编译其文件名为 .iOS.cs 的 C# 代码。
不要编译文件名以 . 结尾的 C# 代码 。MacCatalyst.cs,如果你不是为 Mac Catalyst 构建的。
不要编译文件名以 . 结尾的 C# 代码 。Windows.cs(如果你未为 Windows 生成)
Ubuntu 22.04 .NET8 程序 环境安装和运行
开源GTKSystem.Windows.Forms框架让C# Winform支持跨平台运行
一、安装.NET运行时
1.增加微软包安装源
wget https://packages.microsoft.com/config/ubuntu/22.04/packages-microsoft-prod.deb -O packages-microsoft-prod.deb
sudo dpkg -i packages-microsoft-prod.deb
rm packages-microsoft-prod.deb
2.安装.NET8运行时
sudo apt-get update
sudo apt-get install -y aspnetcore-runtime-8.0
安装SDK(如果需要编译)
sudo apt-get update
sudo apt-get install -y dotnet-sdk-8.0
3.验证是否安装成功
dotnet --info
root@ubuntu01:/# dotnet --info
Host:
Version: 8.0.5
Architecture: x64
Commit: 087e15321b
RID: linux-x64
.NET SDKs installed:
No SDKs were found.
.NET runtimes installed:
Microsoft.AspNetCore.App 8.0.5 [/usr/share/dotnet/shared/Microsoft.AspNetCore.App]
Microsoft.NETCore.App 8.0.5 [/usr/share/dotnet/shared/Microsoft.NETCore.App]
Other architectures found:
None
Environment variables:
Not set
global.json file:
Not found
Learn more:
https://aka.ms/dotnet/info
Download .NET:
https://aka.ms/dotnet/download
root@ubuntu01:/#
二、运行程序
1.将发布后文件夹上传到linux服务器
2.添加执行权限
chmod +x -R /file/helloworld/
3.运行DotNet程序
dotnet helloworld.dll
# 增加微软包安装源
wget https://packages.microsoft.com/config/ubuntu/22.04/packages-microsoft-prod.deb -O packages-microsoft-prod.deb
sudo dpkg -i packages-microsoft-prod.deb
rm packages-microsoft-prod.deb
# 安装SDK(如果需要编译)
sudo apt-get update
sudo apt-get install -y dotnet-sdk-8.0
# 安装运行时
sudo apt-get update
sudo apt-get install -y aspnetcore-runtime-8.0
# 验证是否安装成功
dotnet --info
# 上传发布文件到linux服务器
# 添加执行权限
chmod +x -R /file/helloworld/
# 运行DotNet程序
dotnet helloworld.dll
三、使用systemctl管理
在Linux系统中,使用systemd管理.NET程序,实现程序自动开机启动,查看状态等操作。
1.创建service文件
vim /usr/lib/systemd/system/helloword.service
# 添加下面的内容
[Unit]
Description=helloworld .NET Web Application
[Service]
WorkingDirectory=/file/helloworld/
ExecStart=/usr/bin/dotnet /file/helloword/helloworld.dll
Restart=always
# Restart service after 2 seconds if the dotnet service crashes:
RestartSec=2
KillSignal=SIGINT
SyslogIdentifier=helloworld
User=root
Environment=ASPNETCORE_ENVIRONMENT=Production
[Install]
WantedBy=multi-user.target
2.添加执行权限
chmod +x /usr/lib/systemd/system/helloworld.service
3.重新加载和启用开机自启
systemctl daemon-reload && systemctl enable helloworld.service
4.查看状态
systemctl status helloworld.service
root@ubuntu01:/# systemctl status helloworld.service
● helloworld.service - helloworld .NET Web Application
Loaded: loaded (/lib/systemd/system/helloworld.service; enabled; vendor preset: enabled)
Active: active (running) since Wed 2024-05-29 17:39:48 CST; 1min 54s ago
Main PID: 27708 (dotnet)
Tasks: 15 (limit: 4558)
Memory: 47.4M
CPU: 1.921s
CGroup: /system.slice/helloworld.service
└─27708 /usr/bin/dotnet /file/helloworld/helloworld.dll
May 29 17:39:48 ubuntu01 systemd[1]: Started helloworld.NET Web Application.
May 29 17:39:48 ubuntu01 helloworld[27708]: * Start load configure...... Configure Load Sucessfull
May 29 17:39:48 ubuntu01 helloworld[27708]: * Mysql connection Openning....
May 29 17:39:48 ubuntu01 helloworld[27708]: Process with an Id of 26029 is not running.
5.查看进程
ps -ef | grep helloworld
ASP.NET Core 程序发布到Linux(Centos7)爬坑实战
首先,我们找到官网教程,安装.NET Core 环境。地址:https://www.microsoft.com/net/core#linuxcentos
正如教程中所说,安装之前先删除以前的版本。我的删除方法就是手动删相应的文件夹。然后按照教程一步一步来就OK了。当然不排除你在实战过程中会遇到各种各样的麻烦,多搜,网上还是有方案的。
sudo yum install libunwind libicu
curl -sSL -o dotnet.tar.gz https://go.microsoft.com/fwlink/?linkid=843449
sudo mkdir -p /opt/dotnet && sudo tar zxf dotnet.tar.gz -C /opt/dotnet
sudo ln -s /opt/dotnet/dotnet /usr/local/bin
上述过程如果顺利走完的话,就是没啥问题了,环境就可以了。现在我们随便新建一个ASP.NET Core程序。也不用编写代码,打开相应的程序目录,我的如下:
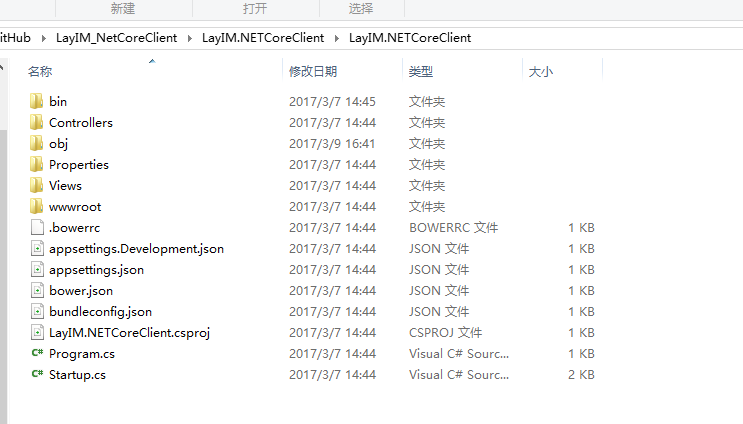
这里呢,虽然发布方法是一样的,但是我用的是git将代码克隆到服务器,然后进行发布的。
首先,定位到相应目录:
cd /root/project/LayIM.NETCoreClient/LayIM.NETCoreClient ---定位到web项目下
然后restore
dotnet restore
然后publish
dotnet publish
发布成功之后,会生成bin/Debug/netcoreapp1.0/publish 文件夹,然后定位到该文件夹,执行:
dotnet LayIM.NETCoreClient.dll --改成你的web项目dll
执行完成之后如下:

虽然,localhost可以访问了,但是在外网访问还是不可以的,我这里的原因是80,5000端口没有开放。开放即可。centos7中开放端口方式如下:
firewall-cmd --zone=public --add-port=80/tcp --permanent
firewall-cmd --zone=public --add-port=5000/tcp --permanent
然后重启firewall
最后,发现还是不能访问。(我也不知道为啥),所以我也没思考直接安装了ngnix。
sudo yum install nginx
sudo service nginx start
改一下配置文件,etc/nginx/nginx.conf
server {
listen 80;
location / {
proxy_pass http://localhost:5000;
proxy_http_version 1.1;
proxy_set_header Upgrade $http_upgrade;
proxy_set_header Connection keep-alive;
proxy_set_header Host $host;
proxy_cache_bypass $http_upgrade;
}
}
然后重启
nginx -s reload
见证奇迹的时候到啦。
总结
成功是成功了,不过还是手动发布的
如何手动给apk签名
手动给APK签名是一个重要的步骤,可以确保应用的完整性和来源。以下是手动给APK签名的步骤:
1.准备工作:
确保已安装Java Development Kit (JDK)。
将JDK的bin目录添加到系统PATH中。
2.生成密钥库(如果还没有): 使用keytool命令生成一个新的密钥库:
keytool -genkey -v -keystore my-release-key.keystore -alias alias_name -keyalg RSA -keysize 2048 -validity 10000
按提示输入密码和其他信息。
3.找到需要签名的APK文件。
4.使用jarsigner工具签名:
jarsigner -verbose -sigalg SHA1withRSA -digestalg SHA1 -keystore my-release-key.keystore my_application.apk alias_name
其中:
my-release-key.keystore 是你的密钥库文件
my_application.apk 是你要签名的APK文件
alias_name 是你在创建密钥库时使用的别名
5.验证签名:
jarsigner -verify -verbose -certs my_application.apk
6.优化APK(可选但推荐): 使用zipalign工具优化APK:
zipalign -v 4 my_application.apk my_application-aligned.apk
注意:zipalign工具通常在Android SDK的build-tools目录中。
重要提示:
保管好你的密钥库文件和密码,丢失它们将导致无法更新应用。
对于发布到Google Play的应用,应该使用相同的密钥签名所有更新版本。
不同的Android版本可能需要不同的签名算法,较新的Android版本可能需要使用更强的算法。
使用这种方法,你可以手动控制APK的签名过程。但是,对于大多数开发场景,使用Android Studio或其他集成开发环境提供的自动化签名过程可能更方便和安全。
dotnet命令行发布程序
例子:dotnet publish -c Release -r win-x64 --self-contained true -o "e:\123"
dotnet publish -c Release -r win-x64 -f net8.0-windows10.0.19041.0 --self-contained true -o "e:\123"
前提:当前终端目录存在 .csproj 项目文件
基础参数
1.-c|--configuration <CONFIGURATION>
指定生成配置(默认为Debug):
dotnet publish -c Release
2.-o|--output <DIRECTORY>
指定输出目录:
dotnet publish -o ./publish/
3.-r|--runtime <RUNTIME_IDENTIFIER>
指定目标运行时(如win-x64、win-x86 win-arm64 win-arm linux-x64 linux-x86 linux-arm64 linux-arm osx-x64 osx-arm64 ):
dotnet publish -r linux-x64
4.--self-contained <true|false>
是否包含.NET运行时(默认跟随项目设置):
dotnet publish --self-contained true # 独立部署
dotnet publish --self-contained false # 框架依赖部署
5.-f|--framework <FRAMEWORK>
指定目标框架(如net8.0):
dotnet publish -f net8.0
高级参数
6.-p:<PROPERTY>=<VALUE>
设置MSBuild属性(支持多个):
# 生成单个文件(需搭配运行时参数)
dotnet publish -p:PublishSingleFile=true -r win-x64
# 裁剪未使用代码(减小体积)
dotnet publish -p:PublishTrimmed=true
# 预编译为机器码(提升启动速度)
dotnet publish -p:PublishReadyToRun=true
7.--no-build
跳过生成阶段(直接发布已编译内容):
dotnet publish --no-build
8.--no-restore
禁止隐式还原依赖:
dotnet publish --no-restore
9.--no-dependencies
忽略项目间引用:
dotnet publish --no-dependencies
10.--force
强制覆盖输出目录:
dotnet publish --force
典型场景示例
1. 跨平台独立部署(单文件)
dotnet publish -c Release -r linux-x64 --self-contained true \
-p:PublishSingleFile=true \
-p:PublishTrimmed=true \
-p:PublishReadyToRun=true
生成一个可在Linux-x64直接运行的二进制文件,体积小且启动快。
2. 框架依赖部署(共享运行时)
dotnet publish -c Release -r win-x64 --self-contained false
输出仅包含应用代码,需目标机器安装对应.NET运行时。
3. 增量发布(仅更新变化文件)
dotnet publish -c Release -o ./out/
复用已编译的中间文件,缩短发布时间。
4. 自定义输出名称
dotnet publish -p:AssemblyName=MyApp -p:PackageId=CustomPackage
修改程序集名称和NuGet包ID。
输出目录结构
默认路径:
./bin/<CONFIGURATION>/<FRAMEWORK>/<RUNTIME>/publish/
示例:
/bin/Release/net8.0/win-x64/publish/MyApp.exe
注意事项
使用--runtime时必须同时指定--self-contained;
裁剪代码(PublishTrimmed)可能导致反射相关功能异常;
单文件部署不支持动态加载程序集(如插件系统);
可通过.pubxml文件预定义发布配置(如Properties/PublishProfiles/FolderProfile.pubxml)。
以下是针对 Linux x64、Linux x86(32位)、ARM(ARM32/ARM64)及 x86 平台的 dotnet publish 发布命令示例:
1. Linux x64(64位 Intel/AMD 架构)
dotnet publish -c Release -r linux-x64 --self-contained true -o ./publish/linux-x64
参数说明
-r linux-x64 表示目标平台为 64 位 Linux 系统(如 Ubuntu/CentOS)。
2. Linux x86(32位 Intel 架构)
dotnet publish -c Release -r linux-x86 --self-contained true -o ./publish/linux-x86
注意
需确保依赖库支持 32 位环境(现代 Linux 发行版可能默认不安装 32 位兼容库)。
3. ARM 平台
ARM32(如树莓派 3B+/Zero)
dotnet publish -c Release -r linux-arm --self-contained true -o ./publish/arm32
ARM64(如树莓派 4B 64位系统)
dotnet publish -c Release -r linux-arm64 --self-contained true -o ./publish/arm64
说明
ARM 设备通常需手动安装依赖(如运行 sudo apt install libc6 libgcc1)。
树莓派建议使用官方 64 位系统以获得更好的兼容性。
4. x86 平台(Windows/Linux)
Windows x86(32位)
dotnet publish -c Release -r win-x86 --self-contained true -o ./publish/win-x86
5. x64平台(Windows/Linux)
Windows x64(64位)
dotnet publish -c Release -r win-x64 --self-contained true -o ./publish/win-x64
如何使用 dotnet 命令行发布带签名的 Android 应用。
1. 首先,确保您有一个有效的签名密钥文件(.keystore)。如果没有,可以使用以下命令生成:
keytool -genkey -v -keystore myapp.keystore -alias myapp -keyalg RSA -keysize 2048 -validity 10000
2在项目文件(.csproj)中添加签名配置:
<PropertyGroup>
<AndroidKeyStore>True</AndroidKeyStore>
<AndroidSigningKeyStore>myapp.keystore</AndroidSigningKeyStore>
<AndroidSigningKeyAlias>myapp</AndroidSigningKeyAlias>
<AndroidSigningKeyPass>your-key-password</AndroidSigningKeyPass>
<AndroidSigningStorePass>your-store-password</AndroidSigningStorePass>
</PropertyGroup>
3.使用 dotnet 命令发布 Android 应用:
发布 Debug 版本:
dotnet publish -f net7.0-android -c Debug
发布 Release 版本:
dotnet publish -f net7.0-android -c Release
指定特定的 Android 架构:
dotnet publish -f net7.0-android -c Release -r android-arm64
4. 常用的发布参数说明:
- -f net7.0-android :指定目标框架
- -c Release :指定配置(Debug/Release)
- -r android-arm64 :指定运行时(可选值:android-arm、android-arm64、android-x64、android-x86)
- --self-contained :包含.NET运行时
- --no-self-contained :不包含.NET运行时
5.完整的发布命令示例:
dotnet publish -f net7.0-android -c Release -r android-arm64 --self-contained true /p:AndroidSigningKeyPass=your-key-password /p:AndroidSigningStorePass=your-store-password
发布后的 APK 文件通常位于:
bin/Release/net7.0-android/android-arm64/publish/
注意事项:
1. 确保已安装最新版本的 .NET SDK
2. 密钥文件(.keystore)要放在项目根目录
3. 为了安全,建议不要在命令行中直接输入密码,而是使用环境变量或配置文件
4. 发布前请确保已正确设置应用的版本号和包名
5. 建议在发布前先在本地测试应用是否正常运行
XML命名空间
命名空间的语法如下:
xmlns:[prefix]=”[url of name]”
其中“xmlns:”是必须的属性。“prefix”是命名空间的别名,它的值不能为xml。
<sample xmlns:ins=”http://www.lsmx.net.ac”>
<ins:batch-list>
<ins:batch>Evening Batch</ins:batch>
</ins:batch-list>
</sample>
.NET4.5的API在.net core 中有哪些api不兼容
输入以下命令以分析当前目录:
ApiPort.exe analyze -f .
若要分析特定 .dll 文件列表,请输入以下命令:
ApiPort.exe analyze -f first.dll -f second.dll -f third.dll
若要以特定版本为目标,请使用 -t 形式参数:
ApiPort.exe analyze -t ".NET, Version=5.0" -f .
NativeAOT 是 .NET 7 正式引入、.NET 8/9 持续完善的**提前编译(AOT,Ahead-of-Time)**技术,和传统 .NET JIT(运行时即时编译)完全不同:**发布时直接把你的 C# 代码 + 依赖框架编译成平台原生机器码,打包成单个可执行文件,运行时不再需要 .NET Runtime**。
## 核心原理
传统 .NET:
`C#源码 → IL中间语言(dll/exe) → 运行时JIT把IL编译成本地机器码 → 执行`
NativeAOT:
`C#源码 → IL → AOT编译器(Illink + RyuJIT) → 直接生成原生机器码exe`
- 编译阶段:IL 链接器(illink)**裁剪掉所有未使用代码**,然后 RyuJIT 一次性把保留的 IL 编译成目标 CPU 架构 (x64/arm64) 原生代码
- 产物:**无依赖原生可执行文件**,目标机器不需要安装 .NET SDK /.NET Runtime
限制(非常关键,很多坑在这里)
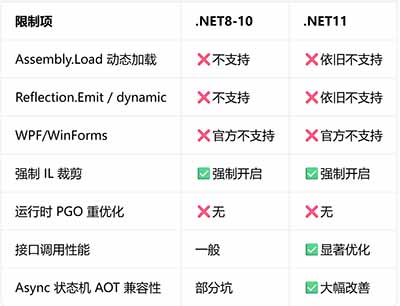
NativeAOT 不是万能,大量 .NET 特性**编译期就禁用**
1. **不支持运行时动态加载程序集**
`Assembly.LoadFrom()`、插件式架构基本不能用。编译阶段所有代码必须被静态分析找到。
2. **反射大幅受限**
简单反射(`typeof`)可以;**需要动态生成类型、动态访问未知类型**的反射会失败。
- 典型踩坑:`System.Text.Json` 老版本无源码生成器、AutoMapper、很多 ORM 动态映射、DI 动态注册类型。
- 解决方案:使用**源码生成器 (Source Generator)**替代运行时反射。
3. **不支持 `dynamic` 关键字**(DLR 动态语言运行时)
4. **泛型部分场景受限**:AOT 编译器需要在编译期实例化泛型;无法动态构造未知泛型参数。
5. **调试体验差一点**:原生机器码调试,不能直接看 IL;堆栈信息和托管程序略有差异。
6. **编译很慢**:大型项目编译耗时明显高于普通发布;裁剪 + AOT 全量分析。
7. **部分库不兼容**:依赖运行时反射、动态加载的第三方包大概率无法 AOT。
8. **不支持所有项目类型**
✅ 支持:Console、[ASP.NET](https://ASP.NET) Core、Worker Service
❌ 暂不支持:WPF / WinForms(.NET9 仍不支持桌面 UI)、Blazor WASM(用的是 MonoAOT)
## 使用方式(.NET 7+)
项目文件 `.csproj` 添加属性:
```
<PropertyGroup>
<PublishAot>true</PublishAot>
</PropertyGroup>
```
发布命令:
```
# 发布windows x64原生程序
dotnet publish -c Release -r win-x64
# linux x64
dotnet publish -c Release -r linux-x64
# linux arm64
dotnet publish -c Release -r linux-arm64
```